Data-Only Hotspot Setup with RAKwireless Concentrator + Raspberry Pi
This guide covers the steps needed to set up a Data-Only Hotspot using a WisLink RAK LPWAN concentrator module and a Raspberry Pi.
Requirements
-
Raspberry Pi: Multiple families are supported, however, not all the models have been tested. It's recommended to follow this guide with a Pi 3 or Pi 4.
-
LoRaWAN Concentrator: The concentrator module and Pi HAT to interface it with the Raspberry Pi. The following table contains the links to concentrators and their HATs.
| WisLink LPWAN Concentrator | Raspberry Pi HAT |
|---|---|
| RAK2287 | RAK2287 Pi HAT |
| RAK2247 | RAK2247 Pi HAT |
| RAK2245 | Pi-compatible |
To use the concentrator module with a Raspberry Pi HAT, you must make sure to order the variation with the SPI interface.
Packet Forwarder Preparation
To prepare the hardware to become a Helium Data-Only Hotspot, it first must be configured to handle LoRaWAN messages. To get started, install an operating system and set up the packet forwarder as outlined in one of the two options below.
LoRaWAN gateways are generally 'headless' computers. The Raspberry Pi Headless documentation is a helpful reference for initial setup.
Option 1
Follow this installation procedure if you are already familiar with the Raspberry Pi and the RAK concentrator modules.
Option 2
Follow the Quick Start Guide for your concentrator on the RAK Documentation Center. If using Wi-Fi for initial setup, it is recommended to initially configure the Raspberry Pi using Raspberry Pi Imager.
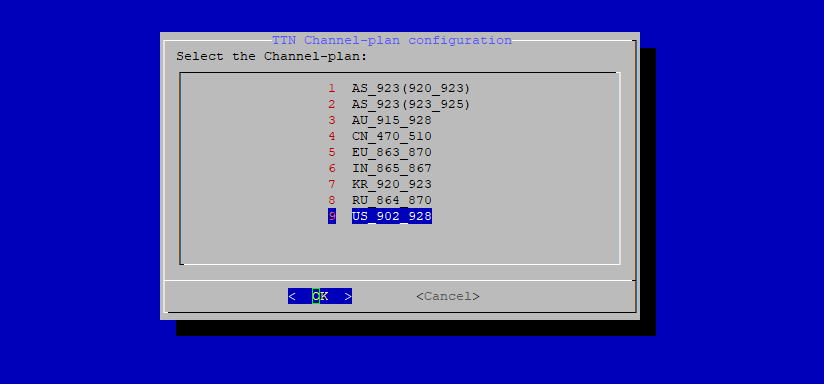
Select the Region Plan
Enter the gateway configuration interface by using the following command:
sudo gateway-config
Select the Setup RAK Gateway Channel Plan option, then Server is TTN, and in the last step choose the proper plan according to your country. To finish, press OK.
Verify If The Packet Forwarder Is Running
When the LoRa packet forwarder is running as a service, some log messages are recorded in the syslog. To inspect the logs, run the following command:
sudo tail -f /var/log/syslog | grep ttn-gateway
The log output should show something similar to:
rak-gateway ttn-gateway[1886]: JSON up: {"stat":{"time":"2021-07-21 16:25:00 GMT","rxnb":0,"rxok":0,"rxfw":0,"ackr":0.0,"dwnb":0,"txnb":0,"temp":0.0}}
rak-gateway ttn-gateway[1886]: INFO: [down] PULL_ACK received in 142 ms
rak-gateway ttn-gateway[1886]: INFO: [down] PULL_ACK received in 142 ms
rak-gateway ttn-gateway[1886]: INFO: [down] PULL_ACK received in 142 ms
rak-gateway ttn-gateway[1886]: ##### 2021-07-21 16:25:30 GMT #####
rak-gateway ttn-gateway[1886]: ### [UPSTREAM] ###
rak-gateway ttn-gateway[1886]: # RF packets received by concentrator: 0
rak-gateway ttn-gateway[1886]: # CRC_OK: 0.00%, CRC_FAIL: 0.00%, NO_CRC: 0.00%
rak-gateway ttn-gateway[1886]: # RF packets forwarded: 0 (0 bytes)
rak-gateway ttn-gateway[1886]: # PUSH_DATA datagrams sent: 1 (122 bytes)
rak-gateway ttn-gateway[1886]: # PUSH_DATA acknowledged: 0.00%
rak-gateway ttn-gateway[1886]: ### [DOWNSTREAM] ###
rak-gateway ttn-gateway[1886]: # PULL_DATA sent: 3 (100.00% acknowledged)
rak-gateway ttn-gateway[1886]: # PULL_RESP(onse) datagrams received: 0 (0 bytes)
rak-gateway ttn-gateway[1886]: # RF packets sent to concentrator: 0 (0 bytes)
rak-gateway ttn-gateway[1886]: # TX errors: 0
rak-gateway ttn-gateway[1886]: ### SX1302 Status ###
rak-gateway ttn-gateway[1886]: # SX1302 counter (INST): 210904434
rak-gateway ttn-gateway[1886]: # SX1302 counter (PPS):  0
rak-gateway ttn-gateway[1886]: # BEACON queued: 0
rak-gateway ttn-gateway[1886]: # BEACON sent so far: 0
rak-gateway ttn-gateway[1886]: # BEACON rejected: 0
ttn-gateway is just the name for the LoRa packet forwarder service in the configuration for these
RAK concentrators; this is a "legacy name" that doesn't change when using different network servers.
Edit the Packet Forwarder Settings
You will need to edit some basic options in the packet forwarder configuration to forward the packets to the address and port the helium_gateway service is listening to.
Select the option Edit packet-forwarder config within the gateway-config interface. This option
will open the global_conf.json file using the nano editor. Then, set the server_address to
127.0.0.1 and the serv_port_up and serv_port_down to 1680, as follows:
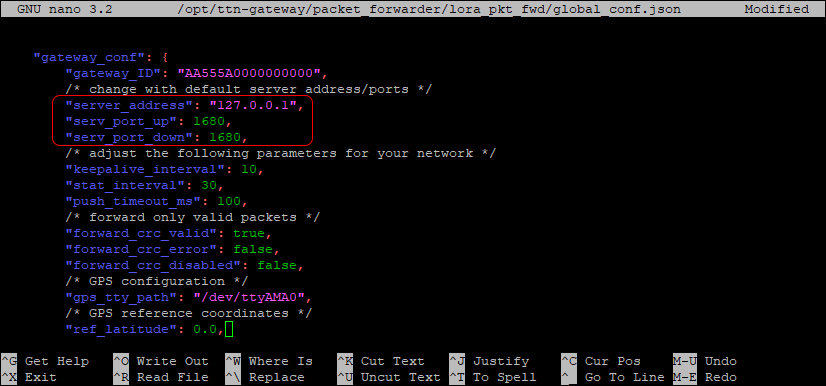
Close the editor by pressing CTRL + X simultaneously, press ENTER to save the file.
Restart the packet forwarder to apply the changes by selecting the option Restart packet-forwarder within the gateway-config interface.
Every time a new region is selected using the Setup RAK Gateway Channel Plan option, these settings are replaced with the default configuration. Make sure to keep this in mind if the region is changed later.
Helium Gateway Service Installation
Downloading the Package
Download the latest release from the gateway-rs repository
on GitHub, and set the <version> according to
the latest release. You can download it in any
directory, for example /tmp.
Option 1
Get from the repo directly to the Raspberry Pi by running the following commands:
cd /tmp
wget https://github.com/helium/gateway-rs/releases/download/<version>/helium-gateway-<version>-armv7-unknown-linux-musleabihf.tar.gz
Expand the archive:
tar -xf helium-gateway-<version>-armv7-unknown-linux-musleabihf.tar.gz
Option 2
You can also download it to your computer and pass it to the Raspberry Pi through the Secure Copy Protocol (SCP):
scp helium-gateway-<version>-armv7-unknown-linux-musleabihf.tar.gz pi@<gateway ip>:/tmp/
Through an SSH connection, expand the archive:
tar -xf helium-gateway-<version>-armv7-unknown-linux-musleabihf.tar.gz
Option 3
Build the program from source. The build chain for gateway-rs is Rust. While build times may be slower, gateway-rs can be built directly on the Raspberry Pi.
curl https://sh.rustup.rs -sSf | sh
source "$HOME/.cargo/env"
sudo apt-get update && sudo apt-get install protobuf-compiler
git clone https://github.com/helium/gateway-rs.git
Increase Raspberry Pi Swap Space A clean Raspberry Pi OS install may not have enough available RAM or swap space to build gateway-rs. Increase the swap space of the Pi for a smooth build.
cd gateway-rs/
cargo build --release
Gateway Configuration
After obtaining or building gateway-rs, move the helium_gateway executable file and
settings.toml file to places where they are easily accessible.
Gateway Settings
The settings.toml file handles the location of the keyfile used to sign messages as well as the
default region configuration for the Helium IoT Network. It is recommended to make a copy of the
settings.toml file that otherwise exists within the gateway-rs/config/ folder.
For simplicity in this guide, place the settings.tomlfile at the home path.
cp gateway-rs/config/settings.toml ~/settings.toml
Similarly, edit settings.toml to match the intended path for gateway_key.bin. The
gateway_key.bin file is created at the defined directory on the first run of the gateway-rs
server.
...
# File based:
keypair = "<path/to/>gateway_key.bin"
...
Create a Service
Create a service to handle automatically starting gateway-rs.
Update the paths in ExecStart for both the location of the helium_gateway binary and the
settings.toml file (Line 6).
Additionally, define the system user to execute the service (Line 9).
# /etc/systemd/system/gateway-rs.service
[Unit]
Description=Helium Gateway

[Service]
ExecStart=</path/to/>helium_gateway -c </path/to/>settings.toml server
Restart=on-failure
RestartSec=15
User=<fill in current user>

[Install]
WantedBy=multi-user.target
Once the service is written and proper paths are set, activate it using the following commands:
sudo systemctl enable gateway-rs.service
sudo systemctl start gateway-rs.service
sudo journalctl -fu gateway-rs
If there are errors in running the service edit it by first stopping the service
(systemctl stop gateway-rs.service), then editing it
(sudo nano /etc/systemd/system/gateway-rs.service). After changes are made, rerun the above
commands to test and monitor.
Region Configuration
The region configuration for gateway-rs is a default. The on-chain asserted location of the Gateway
will override the definition in settings.toml. Updating the region in settings is optional as long
as the Data-Only Hotspot location is asserted..
Verifying the Installation
Inspecting the Service Logs
The service starts after installation automatically. You can check the execution logs by running the following command:
sudo tail -f /var/log/syslog | grep helium_gateway
Getting some Information about the Data-Only Hotspot
Use the following command to get the public key address and animal name of your Data-Only Hotspot:
./helium_gateway -c ~/settings.toml key info
This command should give you an output like the following one:
{
  "address": <hotspot address>,
  "onboarding": <hotspot address>,
  "name": <hotspot name>
}
Backup the gateway_key
The gateway_key.bin file stores the information used to identify the Data-Only Hotspot on the
Helium IoT Network. It's highly advised to backup this file, especially if you need to recover it
later after the onboarding process.
Using SCP could be an option to do the backup; that would be something like this:
scp pi@<gateway ip>:/etc/helium_gateway/gateway_key.bin <destination directory>
If using Windows, a tool like WinSCP will enable this functionality.
Onboard the Data-Only Hotspot
Refer to the Data-Only Hotspot Onboarding section to complete the onboarding of the fully-configured Data-Only Hotspot.
Video Guide for Setup
This Hands-on with RAKStars session follows the steps provided in this guide.