Dragino LoRaWAN Gateway Setup
This guide provides instructions on how to configure an 8-channel Dragino LoRaWAN gateway such as the LPS8 or DLOS8 to work with the Helium IoT Network.
Prerequisites
Before configuring your Dragino to work with the Helium IoT Network, please confirm that it is connected to the Internet and updated to the latest firmware. Refer to the user guide provided on the Dragino download site for more detailed instructions.
Configure LoRaWAN Frequency Plan
To be able to send and receive LoRaWAN data, your Gateway must be configured to the frequency plan specified for your region. You may be able to use the predefined frequency in the Dragino software or in some cases may need to manually set them per the frequencies used by the Helium IoT Network in your region.
- Log into the Dragino gateway web interface. In the standard Dragino firmware connect via your
browser at
http://<ip_address>:8000once the Dragino is connected to your network. - Navigate to Lora > Lora from the Menu.
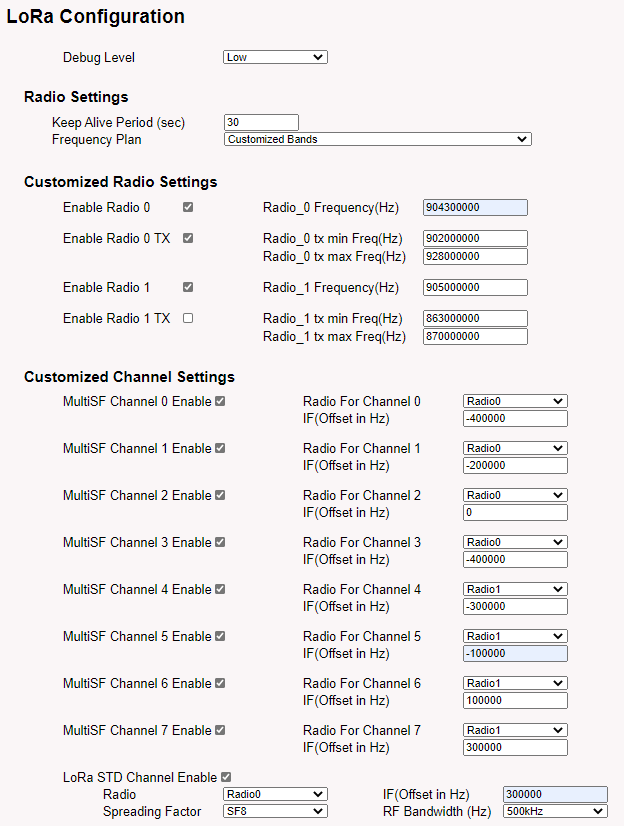
- Under Radio Settings, select your region in the Frequency Plan drop-down and, if applicable, the Frequency Sub Band. For example, in the US, select US915 for the frequency plan and 2 for the sub-band.
- If desired, set Static GPS coordinates.
- Click Save & Apply.
For some regions, it may be necessary to manually populate the Customized Channel Settings based on
the Helium frequencies for your region. Refer to the
Helium sample LoRa packet forwarder global.conf files
for your region as a guide to the values to use. You can check the values used by the pre-defined
frequency plans by viewing the global_conf.json file: cat /etc/lora/global_conf.json.
Example of customized channel settings using the US915 frequency plan for the Helium IoT Network
Configure LoRaWAN Settings
Next, you will configure the LoRa packet forwarder on the Dragino to forward packets to the Helium Gateway service which will be installed on the Dragino in the next step.
- From the Dragino web interface, navigate to LoRaWAN > LoRaWAN from the menu.
- Select
Custom / Private LoRaWANfrom the Service Provider. - Set the Server Address to
127.0.0.1and both Uplink and Downlink ports to1680. This will configure the forwarder to use the default port used by Helium Gateway.
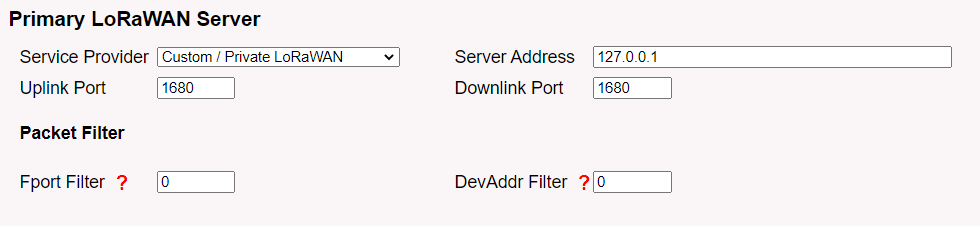
- Click Save & Apply.
Install Helium Gateway (gateway-rs) on the Dragino
Finally, you will install the Helium Gateway service. This requires SSH access to the Dragino.
- Connect to the Dragino over SSH. By default, the standard Dragino firmware uses port 2222 for SSH
(the OpenVPN firmware uses port 22) and the root user has access.
ssh root@<ip address> -p 2222. - Copy the Helium Gateway package to the Dragino. The latest
source code and pre-built
releases are available on GitHub. Option 1:
Download from GitHub: On the Dragino run
cd /tmpandwget -O helium-gateway-<version>-dragino.ipk https://github.com/helium/gateway-rs/releases/download/<version>/helium-gateway-<version>-dragino.ipk. Option 2: Copy from another computer: Run this command from on the computer within the directory containing the packagescp helium-gateway-<version>-dragino.ipk <dragino ip>:/tmp/. - Install the Helium Gateway package
opkg install /tmp/helium-gateway-<version>-dragino.ipk. - Backup your key file
/etc/helium_gateway/gateway_key.binand keep in a safe place. This will be needed to recover this Gateway especially if it is onboarded to the Helium IoT Network.
Helium Gateway is now installed and should be running. Use the command helium_gateway key info to
view the public key address and animal name of your Gateway.
Verify
Your Dragino gateway should now be set up and forwarding LoRaWAN data traffic to the Helium IoT Network.
Use the Dragino system log to verify that Helium Gateway has started. You can view the log in the
web interface or by using logread on the command line interface (e.g,
logread | grep helium_gateway). In the logs, you should see messages indicating helium_gateway is
starting. If you do not see these, try restarting the service (/etc/init.d/helium_gateway restart)
or reboot the Dragino as the messages may have rotated out of the log.
Example logs showing the Helium Gateway service starting
Thu Mar 25 19:43:06 2021 daemon.err helium_gateway[2031]: Mar 25 19:43:06.184 INFO starting server, key: <public key>, version: 1.0.0-alpha.4
Thu Mar 25 19:43:06 2021 daemon.err helium_gateway[2031]: Mar 25 19:43:06.289 INFO starting, module: gateway
Thu Mar 25 19:43:06 2021 daemon.err helium_gateway[2031]: Mar 25 19:43:06.306 INFO starting, module: router
Additionally, the LoRa Packet Forwarder log can provide some clues as to whether the LoRaWAN server
configuration is correct. Search the system log for PULL_DATA messages and confirm that they are
acknowledged such as REPORT~ # PULL_DATA sent: 1 (100.00% acknowledged). This indicates that the
packet forwarder is communicating with the Helium Gateway service running on the Dragino and is
getting replies from the service as expected. Note, this is not a foolproof way to confirm it is
configured correctly. By default, the LoRaWAN Server settings are configured for the TTN EU server
which will also provide acknowledgment. However, the absence of acknowledgment could indicate that
the LoRaWAN settings are not correct per the above.
Onboard as Data-Only Hotspot
As part of the Hotspot project, a new class of Hotspots called "Data-Only Hotspots" can be added to the Helium IoT Network, meaning Dragino LPS80/DLOS8 Hotspots can be added to the network. These data-only Hotspots reward IOT tokens for transferring data but never for Proof-of-Coverage. This onboarding process will require using the Helium CLI Wallet to submit the onboarding and assert location transactions. See Prepare the Helium Wallet CLI and further information for specific details on Hotspot onboarding.