Extreme ExtremeCloud IQ Conversion Guide
Prerequisites
- ExtremeCloud IQ is running on your Extreme system.
- An on-prem Extreme controller is in use for the network.
- At least one access point is linked to that controller.
- Existing SSID(s) already have basic traffic routing in place.
- You have an Intel-based host on the network for the RadSecProxy container.
- RadSecProxy is deployed and running before you configure Extreme. See Deploy RadSecProxy Container for deployment steps.
High-Level Steps
- Deploy the RadSecProxy container and note the host’s IP address.
- Set up the wireless LAN: create an SSID and add RADIUS (RadSec) servers.
- Configure Hotspot 2.0 for Passpoint.
- Deploy the configuration to your access points.
- Test Passpoint connectivity.
Deploy RadSecProxy Container
RADIUS messages used to authenticate users and for session accounting are transmitted unsecured and over UDP by default. By directing these messages internally in your secure network to a RadSecProxy, the UDP is then converted to a TLS protected TCP connection to the Helium Network core AAA servers.
RadSecProxy Prerequisites
- An Intel-based machine with Docker installed.
- The Intel-based machine has a private IP in your network reachable from your Extreme controller.
- ACLs or Firewalls allow Extreme controller and Docker container to communicate UDP on port 1812 and 1813.
- ACLs or Firewalls allow container/host to reach the internet on TCP ports 2083 and 3802.
RadSecProxy Container Deployment
-
Un-zip and untar the
Helium_RadSec_Docker.tar.gzfile into a directory of your choice on the host machine. This will unpack:Dockerfile- The Docker instructions to build the containerRadsecproxy.conf- Pre-populated to connect to Helium Network AAA serversdocker-compose.yml- File to start and stop the container as a daemon
tar -xvzf Helium_RadSec_Docker.tar.gz -
Into the same directory, copy the 3 certificates obtained from Helium Network:
ca.pem- The root CA certificatecert.pem- The user certificatekey.pem- The key file matched to the certificate
-
Start the container using:
sudo docker compose up -d -
To stop the container:
sudo docker compose down -
Record the private IP address of the RadSecProxy host machine. You'll use this IP when configuring RADIUS servers in your Extreme controller.
Access the ExtremeCloud IQ Dashboard
Sign in to ExtremeCloud IQ with an account that has admin rights (or equivalent for your environment). Once logged in, the dashboard shows your access points.
Note: The UI exposes many options; this guide only calls out fields you must set. Leave unspecified options at their defaults unless you have a reason to change them.
Set Up the Wireless LAN
You will define a network policy, an SSID, and RadSec/RADIUS servers.
Create a Network Policy
- In the left menu, click Configure.
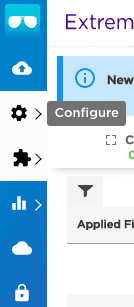
- Open Network Policies.
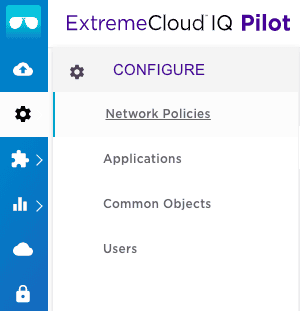
The Network Policy list is shown.
-
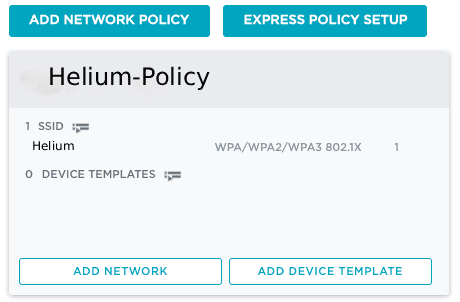
Click Add Network Policy. The new-policy screen opens with Policy Details selected.
-
Under What type of policy are you creating?, keep Wireless checked and clear Switches and Routing.
-
Set a Policy Name (e.g.
Helium_network_policy) and click Save (bottom right). You are taken to the Wireless Networks screen.
Create an SSID
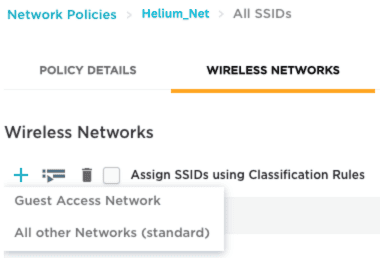
- Go to Configure → Network Policies → Wireless Networks (top).
- Click + to add an SSID and choose All other Networks (standard). The SSID and authentication form is shown.
-
Set an SSID Name for internal use (e.g.
Helium) and a Broadcast Name for clients; these can match. -
Set SSID Usage to Enterprise (instead of Private Pre-Shared Key). For Key Management, choose WPA3-802.1X and for Encryption Method, choose CCMP (AES).
Add RadSec Authentication Servers to the Network Policy
The controller will talk to your RadSecProxy; RadSecProxy then sends RADIUS over TLS to Helium. Use the RadSecProxy host’s private IP or hostname from Deploy RadSecProxy Container.
Add a RADIUS server group and add your RadSec server(s) to it. Your Extreme controller must support RadSec (RADIUS over TLS).
- On the Wireless Networks screen, scroll to Authentication Settings.
- Under Authenticate via RADIUS Server, click + to create a RADIUS server group. The Configure RADIUS Servers dialog opens.
- Give the group a name (e.g.
Helium_radsec_group). - Click Settings next to the group. In Select RADIUS Settings, set Accounting interim
update interval to
300seconds, then click Save RADIUS Settings. You are back in Configure RADIUS Servers. - Click + under External RADIUS Server. A New External RADIUS Server block appears.
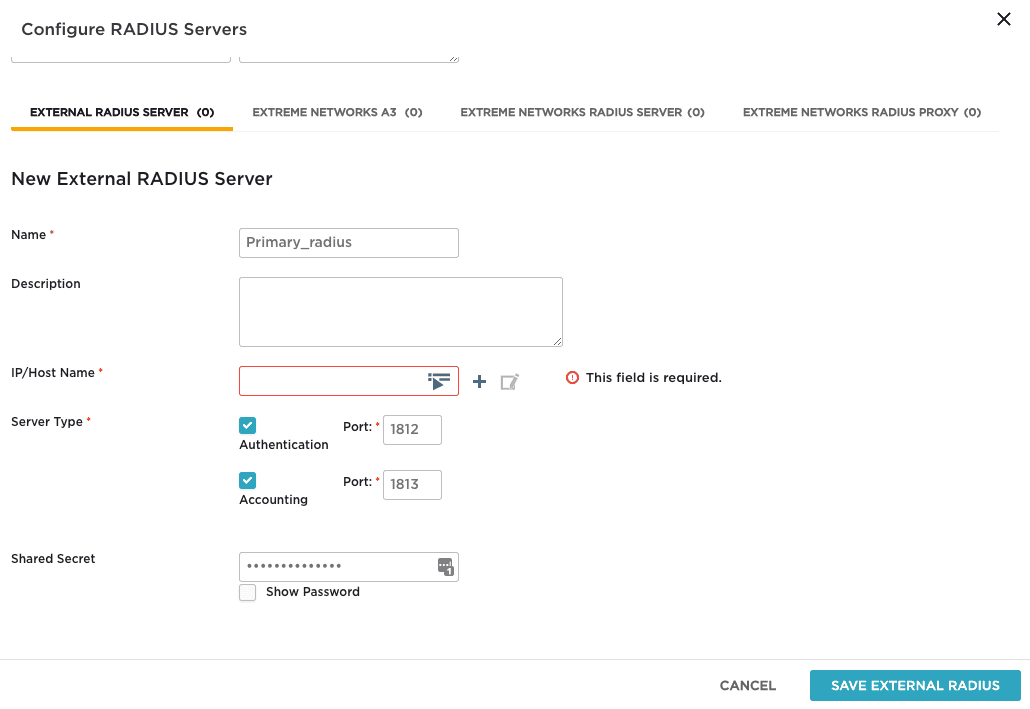
- Set a Name (e.g.
primary_radius). - Click + beside IP/Host Name, choose IP Address, and in the New IP Address or Host
Name dialog set an object Name (e.g.
Primary). - In IP/Host Name, enter your RadSecProxy address and port
1812(e.g.192.168.1.100). Click Save IP Object. The new server section now shows that IP/host object. - Set Shared Secret to
mysecret(the default in the Helium RadSecProxy container). - Click Save External RADIUS. Back on Configure RADIUS Servers, the new server (e.g.
primary_radius) is listed. - Check the box for that server so it is included in the group, then click Save RADIUS. You return to Authentication Settings with the new group and server shown.
- Click Save (bottom right) to store the network policy. You are back on Wireless Networks with your new SSID listed.
Assign the SSID to the Network Policy
- On the Wireless Networks page, check the box for your SSID (e.g.
Helium). - Click Next (bottom right) to attach that SSID to the network policy.
Wireless LAN and policy setup are done.
Configure Hotspot 2.0
Hotspot 2.0 (Passpoint) lets devices automatically connect to your WiFi when they are in range. ExtremeCloud IQ uses the supplemental CLI for Hotspot 2.0; you type or paste commands in the GUI. Prepare the CLI in a text file first so you can paste it when you enable the supplemental CLI.
Compose Your CLI
Put the following in a text file so you can paste it into the Supplemental CLI later. These commands tie your network policy to Hotspot 2.0.
- Hotspot profile and network type
Create a profile (e.g.Helium-profile) with an ANQP domain ID and network type. Useanqp-domain-id 0so ANQP is scoped to this AP. Use network type2for a chargeable public network with internet access.
   hotspot profile Helium-profile
   hotspot profile Helium-profile anqp-domain-id 0
   hotspot profile Helium-profile network-type 2 access-internet
- Operator and language
Set the operator name (e.g.Helium-Operator) and language (e.g. English).
hotspot profile Helium-profile operator-name Helium-Operator language-code eng
- IP support
Use IPv4 with double-NAT private addressing (ip-type ipv4 2) and no IPv6 (ipv6 0).
hotspot profile Helium-profile ip-type ipv4 2 ipv6 0
- Domains
Add both Helium Passpoint domains:
   hotspot profile Helium-profile domain-name freedomfi.com
   hotspot profile Helium-profile domain-name hellohelium.com
- NAI realms
Define NAI realms for Helium Passpoint with encoding type0, EAP method13(EAP-TLS), and certificate as the authentication method.
   hotspot profile Helium-profile nai-realm freedomfi.com encoding-type 0
   hotspot profile Helium-profile nai-realm freedomfi.com eap-method 13
   hotspot profile Helium-profile nai-realm hellohelium.com encoding-type 0
   hotspot profile Helium-profile nai-realm hellohelium.com eap-method 13
- SSID security
Set the Helium SSID to use WPA3-AES 802.1X:
security-object Helium security protocol-suite wpa3-aes-8021x
- Attach hotspot profile to SSID
Apply the hotspot profile to the Helium SSID:
ssid Helium hotspot-profile Helium-profile
- Persist config
Save the configuration:
save configuration
Enable the Supplemental CLI
- Under your user icon (top right), open Global Settings.
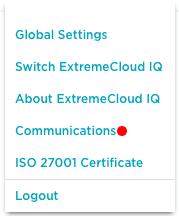
- Under Administration, open VIQ Management on the left. The VIQ Management page opens.
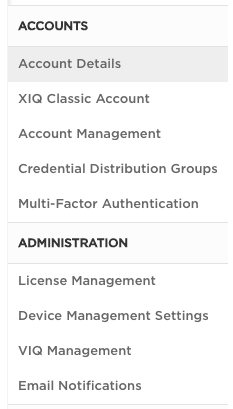
- Ensure Supplemental CLI is turned ON.
Apply the Hotspot 2.0 Configuration to the Network Policy
- Go to Configure → Network Policies. Open your policy (e.g.
Helium_network_policy). - Click your SSID name (e.g.
Helium) to open the Wireless Network page. - Open Additional Settings in the top bar (e.g. you may see the DNS Server page).
- Under Policy Settings on the left, open Supplemental CLI.
- Ensure Supplemental CLI is enabled on this page.
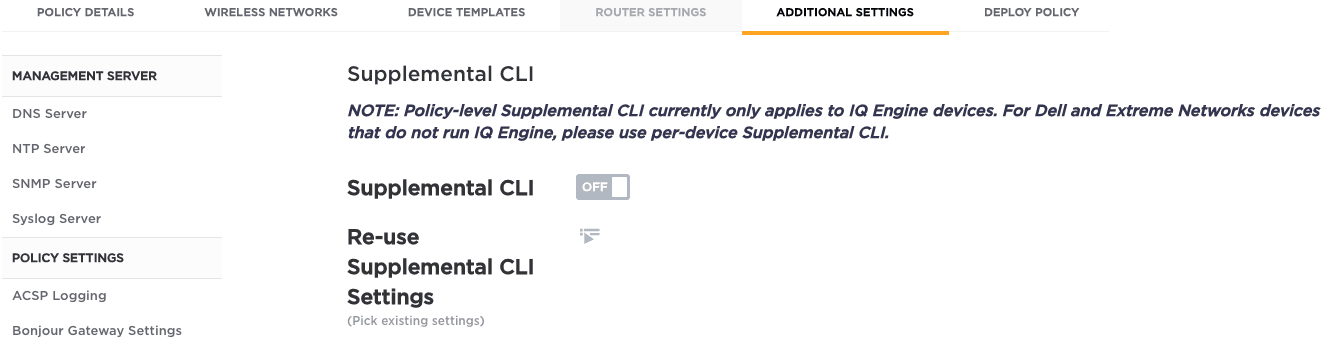
- Enter a Name (e.g.
Hotspot) and paste your CLI commands into CLI Commands. - Click Save (bottom right). A confirmation appears that the supplemental CLI was saved.
- Click Next to open Apply the network policy to selected devices.
- Click Eligible to list access points, then select the APs you want (checkboxes in the Status column).
- Click Upload (bottom right). The Device Update dialog opens.
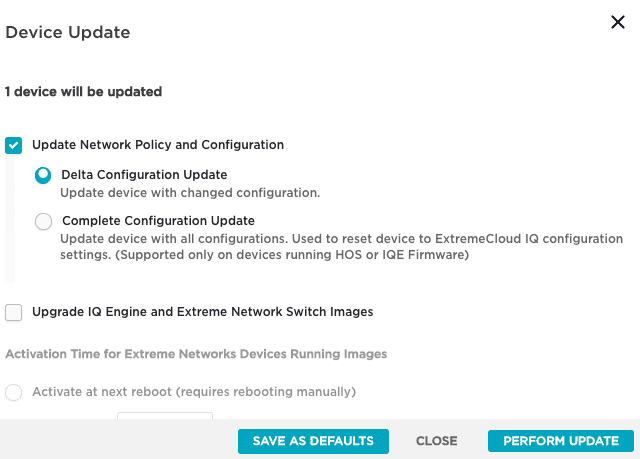
- Under Update Network Policy and Configuration, choose Complete Configuration Update (not Delta).
- Click Perform Update (bottom right). The APs reboot; wait a few minutes. A success message appears when deployment finishes.