Configure Routing Rules
With ChirpStack up and running, OUI-specific routing and sensor configurations can be added to the Helium Config Service to enable sensor data to be routed to the ChirpStack instance.
If ChirpStack was deployed with the Docker Compose configuration, routing rules will need to be manually configured.
However, if ChirpStack was deployed with the Kubernetes configuration, routing rules are programmatically added via the Helium Network sidecar application and do not need to be manually configured in the manner described below.
Initialize Helium Config Service CLI
First, initialize the Helium Config Service CLI by running helium-config-service-cli env init. A
series of prompts, as noted below, will be provided in the terminal session.
- For
Config Service Host, press enter to use the default value (e.g.,https://config.iot.mainnet.helium.io:6080). - For
Keypair Location, provide the location of the delegate keypair in the local filesystem. - For
Net ID, provide00003C. - For
Assigned OUI, provide your assigned OUI number. - For
Default Max Copies, press enter to use the default value (e.g.,15).
After providing the initialization information, an output similar to the below will be provided:
Put these in your environment
------------------------------------
HELIUM_KEYPAIR_BIN=<./your/path/to/delegate/keypair.bin>
HELIUM_NET_ID=00003C
HELIUM_OUI=<OUI_ID>
HELIUM_MAX_COPIES=15
Second, as suggested in the output, export the suggested environment variables into the terminal
session. This needs to be done manually. To do so, just add export to each line in the manner
provided below and run the commands:
export HELIUM_KEYPAIR_BIN=<./your/path/to/delegate/keypair.bin>
export HELIUM_NET_ID=00003C
export HELIUM_OUI=<OUI_ID>
export HELIUM_MAX_COPIES=15
Generate Route in Helium Config Service
Routes contain the necessary information for the Helium Packet Router to know how to route a packet sent from a sensor to the proper LNS. In particular, Helium Packet Router leverages information provided in a generated route such as DevEUI+AppEUI (for routing join requests), DevAddr range (for routing uplinks), and LNS endpoint to inform routing decisions.
To generate a route via the Helium Config Service CLI, run the helium-config-service-cli route new
command. As shown below, the command will perform a "dry run" if the --commit flag isn't provided.
In such cases when the --commit flag isn't provided, the command will show what would have been
transmitted to the Helium Config Service (e.g., a configuration service which informs routing
behavior of the Helium Packet Router). In this way, you can review the route information prior to
formally submitting.
helium-config-service-cli route new
== DRY RUN == (pass `--commit`)
{
  "id": "",
  "net_id": "00003C",
  "oui": <oui>,
  "server": {
    "host": "",
    "port": 0,
    "protocol": {
      "type": "packet_router"
    }
  },
  "max_copies": 15,
  "active": true,
  "locked": false,
  "ignore_empty_skf": false
}
Once the result looks satisfactory, simply run helium-config-service-cli route new --commit to
submit the route to Helium Config Service.
Configure Route in Helium Config Service
After generating a route, the route needs to be configured for the ChirpStack implementation. This will involve specifying the ChirpStack endpoint and default port and adding LoRaWAN region-specific routing configuration.
Specify ChirpStack Endpoint and Default Port
To specify the ChirpStack endpoint and default port, use the Helium Config Service CLI and run the
helium-config-service-cli route update server command. As shown below, the command will perform a
"dry run" if the --commit flag isn't provided.
In preparing the command, please note that the --host flag should point to the IP address of the
server running the ChirpStack instance, the --port flag serves as the default for routing messages
to ChirpStack, and the --route-id flag corresponds to the route that was just created.
helium-config-service-cli route update server --host <server ip> --port <port> --route-id <route id>
== DRY RUN == (pass `--commit`)
Updated <route id>
== Old
{
  "id": <route id>,
  "net_id": "00003C",
  "oui": <oui>,
  "server": {
    "host": "",
    "port": 0,
    "protocol": {
      "type": "packet_router"
    }
  },
  "max_copies": 15,
  "active": true,
  "locked": false,
  "ignore_empty_skf": false
}
== New
{
  "id": <route id>,
  "net_id": "00003C",
  "oui": <oui>,
  "server": {
    "host": <server ip>,
    "port": <port>,
    "protocol": {
      "type": "packet_router"
    }
  },
  "max_copies": 15,
  "active": true,
  "locked": false,
  "ignore_empty_skf": false
}
Once the result looks as desired, simply re-run the command with the --commit to update the
route.
Add LoRaWAN Region-Specific Routing Configuration
To add LoRaWAN region-specific routing configuration, use the Helium Config Service CLI and run the
helium-config-service-cli route update add-gwmp-region command. As shown below, the command will
perform a "dry run" if the --commit flag isn't provided.
In preparing the command, the LoRaWAN region is proceeded by the port to be used for the region. For
example, in the example command below, the region us915 is proceeded by <us915 port>. Here, the
<us915 port> value will mirror the port bound to the chirpstack-gateway-bridge-us915 container
(e.g., 1701).
Please note that the command will also need to be run for the eu868 region for port 1700.
helium-config-service-cli route update add-gwmp-region --route-id <route-id> us915 <us915 port>
== DRY RUN == (pass `--commit`)
Updated <route id>
== Old
{
  "id": <route id>,
  "net_id": "00003C",
  "oui": <oui>,
  "server": {
    "host": "",
    "port": 0,
    "protocol": {
      "type": "packet_router"
    }
  },
  "max_copies": 15,
  "active": true,
  "locked": false,
  "ignore_empty_skf": false
}
== New
{
  "id": <route id>,
  "net_id": "00003C",
  "oui": <oui>,
  "server": {
    "host": "",
    "port": 0,
    "protocol": {
      "type": "gwmp",
      "mapping": {
        "US915": 1701
      }
    }
  },
  "max_copies": 15,
  "active": true,
  "locked": false,
  "ignore_empty_skf": false
}
After adding the LoRaWAN region-specific routing configuration for US915 and EU868, the
configuration should look similar to the below:
{
  "id": <route id>,
  "net_id": "00003C",
  "oui": <oui>,
  "server": {
    "host": "",
    "port": 0,
    "protocol": {
      "type": "gwmp",
      "mapping": {
        "US915": 1701,
        "EU868": 1700
      }
    }
  },
  "max_copies": 15,
  "active": true,
  "locked": false,
  "ignore_empty_skf": false
}
Add Device to ChirpStack
To add a device in Chirpstack, please follow the documentation in either of the guides below and return here when complete.
Configure Device in Helium Config Service
Now that the device is successfully created on ChirpStack, Helium Config Service needs to be configured to know about the device. In doing so, the Helium Config Service CLI will be used to associate the device EUIs and devAddrs with the route.
Add Device EUIs to Route
To add device EUIs to the route, run the helium-config-service-cli route euis add command. As
shown below, the command will perform a "dry run" if the --commit flag isn't provided.
In preparing the command, the --route-id flag corresponds to the id of the route created above,
the --dev-eui flag corresponds to the device EUI generated entered in ChirpStack, and the
--app-eui flag corresponds to the join EUI also entered in ChirpStack.
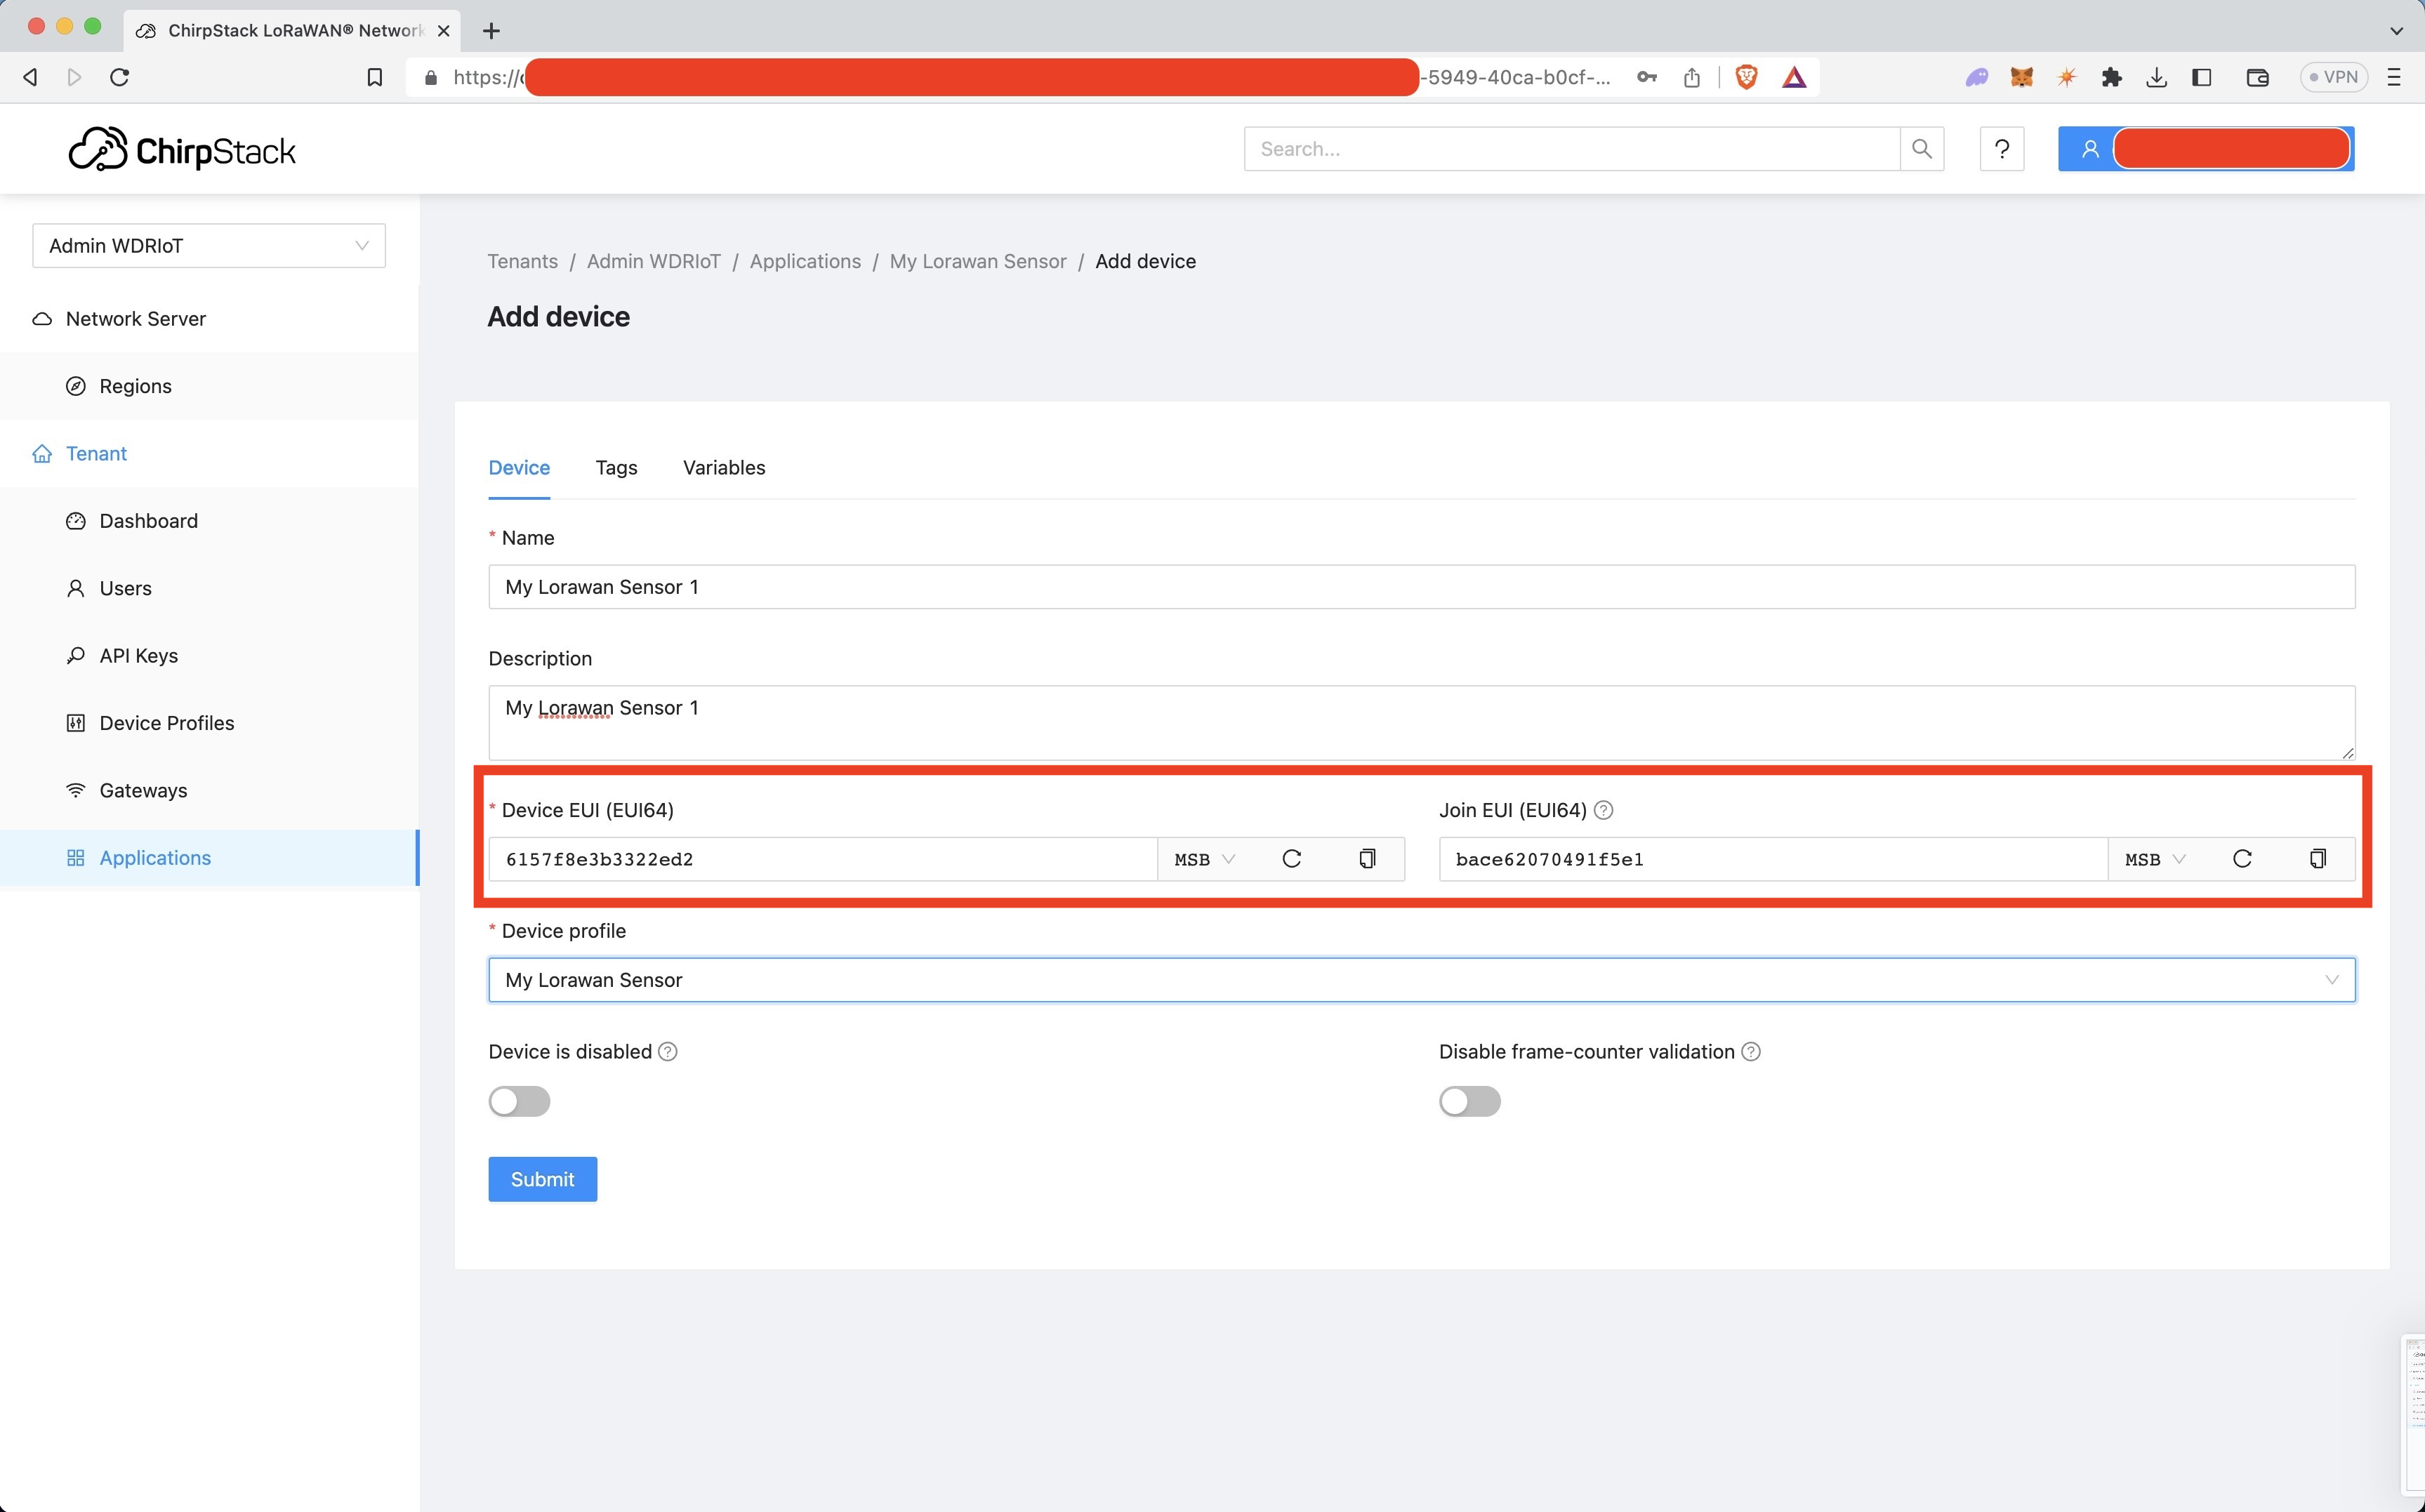
Please refer to the red-boxed portion of image below to find the device and join EUIs in ChirpStack.
helium-config-service-cli route euis add --route-id <route-id> --dev-eui <dev-eui> --app-eui <app-eui>
Once the result looks as desired, simply re-run the command with the --commit to add the device
to the route.
Add DevAddr to Route
To add DevAddrs to the route, run the helium-config-service-cli route devaddrs add command. As
shown below, the command will perform a "dry run" if the --commit flag isn't provided.
Here, the --start-addr and --end-addr values correspond to the results from the
helium-config-service-cli org get --oui <OUI> command described in detail in
Gather Helium DevAddr Subnet Information for OUI
helium-config-service-cli route devaddrs add --start-addr <start devAddr> --end-addr <end devAddr> --route-id <route-id>
Again, once the result looks as desired, simply re-run the command with the --commit to add the
DevAddr to the route.
Next Steps
You now have a fully functioning LNS on the Helium IoT network. For additional advanced configurations, including automating the device addition process, please see Advanced Configuration.