PlatformIO
Getting Started With Helium, PlatformIO and Heltec CubeCell
The Heltec CubeCell HTCC AB0x are one of Heltec's line of popular ASR605x(ARM® Cortex® M0+ Core) based LoRa development boards with built in USB and battery charging.
Introduction
Before we begin, please make sure you've followed the steps from this guide, which goes over some initial setup steps.
This guide will walk through installing PlatformIO and deploying a Helium Arduino program on a target device.
PlatformIO is a cross-platform, cross-architecture, multiple framework, professional tool for embedded systems engineers and software developers who write applications for embedded products.
Here, we will detail the steps required to integrate a specific board type, one of the Heltec CubeCell AB0x family of boards.
However, this guide can be also used to on-board many other types of target devices. In most cases one can just substitute your target device in place of the CubeCell developer board.
Objective and Requirements
In this guide, you will learn:
- How to set up your PlatformIO IDE environment
- How to create, build, and upload a simple embedded application
- How to program a basic application that will send packets over the Helium Network
- Verify real-time packets sent to the Helium Console via Hotspot that's in range
For this example, you will need one of the following Heltec development boards. The Helium community has experience with the AB01, AB02x and CubeCell Capsule line boards. Subsequent follow on products may work but have not been tested.
At the end of this tutorial, there is an example that can run within your web browser.
Hardware
- Heltec CubeCell Development Boards (AB01, AB02x, Capsule)
- Micro USB Type B Cable - Example
Software
PlatformIO is not a standalone IDE, it installs as an extension to Microsoft VSCode. The Helium Console is a cloud-based device management tool that we will use to enable our device access to the Helium network. There is no installation required however one will need to create a user account with the Helium Console.
Hardware Setup
Attaching the LoRa Antenna
Your board should have come with a U.FL antenna. All you have to do is attach it to the U.FL port on the developer board. The method of attachment varies depending on the target board.
In the case of our example Heltec CubeCell board, some versions of the board may have more than one U.FL port, if this is the case generally the LoRa antenna attaches to the port that is on the same side of the board as contains the USB port connector. In all cases, it is best to verify the proper connector with the board manufacturer.
Connect Target Board to Development PC
The target boards are typically connected to the host computer via a USB 2.0 A-Male to Micro B cable. Again this may vary depending on your target board.
Install Develop Machine Serial Driver
Some operating systems, especially Windows, will require the installation of hardware-specific USB device driver code. Most hardware developer board vendors will supply directions on how this can be accomplished.
For our example installation directions can be found on Heltec's documentation website here.
Software Setup
Setting up the VSCode/PlatformIO IDE environment while not complex, does require several steps that are independent of your target device. We will walk through these initial setup steps before trying to integrate Helium network access code into the mix.
Installing PlatformIO
Using the VSCode instructions found here download and install Microsoft's Visual Studio Code. PlatformIO IDE is built on top of VSCode as an extension. Once the VSCode is installed:
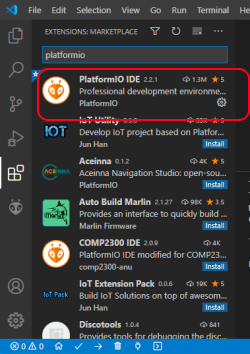
- Open VSCode Extension Manager by clicking on the Extensions icon on the left side of the main view.
- Within the Extensions Marketplace search for the official PlatformIO IDE extension
- Install PlatformIO IDE. (https://marketplace.visualstudio.com/items?itemName=platformio.platformio-ide)
It is highly recommended to give the quick-start guide a read. It will help you navigate the unfamiliar interface. https://docs.platformio.org/en/latest/integration/ide/vscode.html#quick-start
In this tutorial, as an example, we will be using the Heltec CubeCell AB0x. One can substitute your target device as needed as you progress through these steps.
Once PlatformIO is installed, you should be welcomed to VSCode with the following "PIO Home" screen:
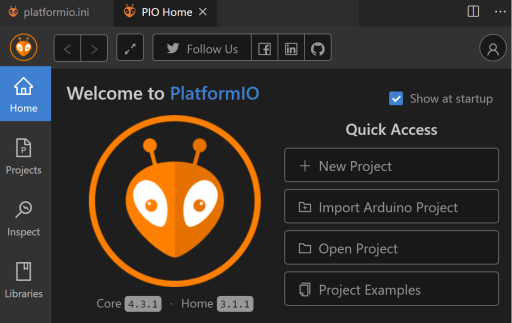
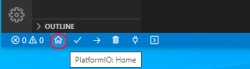
If not already open, the PlatformIO "Home" view can be opened by clicking on the house icon within the VScode status bar.
Creating a New PlatformIO Project
If you have not already used PlatformIO to build, upload and verify the operation of a sample application it is best to familiarize yourself with the basic use of PlatformIO before adding the complexity of Helium network access code to the mix.
If you are familiar and confident with the steps required you can continue at "Sample Helium Network Access Code" by clicking here.
The following steps will walk you through what is required to:
- create a template project
- inspect the default source file, main.cpp as well as the primary project configuration file, platformio.ini
- build the project and inspect the build log output
- upload the sample binary to the target development board.
- inspect serial output debug information.
Before proceeding with the actual code that will connect to the Helium network, create a sample, template project.
Open "New Project Wizard" - Select project name and board
-
Within the "PIO Home" view click on "New Project".
-
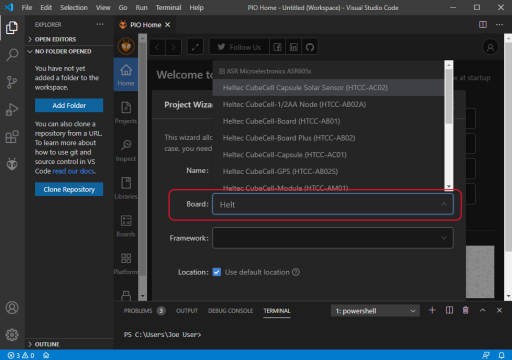
At the "Project Wizard" dialog enter a name for your project in the "Name" field.
-
Within the "Board" field select the appropriate target board by entering the name of the manufacturer, "Heltec" for our example. The PlatformIO auto search feature should present you with a known list of supported boards. In our case, we enter "Heltec" and choose the "Heltec CubceCell-GPS (HTCC-AB02S)" from the supplied list.
Note: If your target device is different start to enter the device manufacturer in the "Board" field, PlatformIO will attempt to fill in the entry with those devices that it is aware of. Hopefully, your device will be presented in the list. If so, select it.
Select framework and project location
- Select the desired runtime framework from the "Framework" drop-down. Target devices may support one, and possibly more than one, runtime framework. Choose what is appropriate for your target. At present only "Arduino" is supported for the board we have selected for our example.
- For the location, if the checkbox is selected the project will be created within the default PlatformIO workspace, which is sufficient for our purposes.
- Click the "Finish" button to create the project. ( You may need to scroll down the wizard window to expose the Finish button)
Note: The time taken to create a project will vary depending on whether or not the selected platform and framework files have been previously downloaded. When the project has been created it should be shown within the PlatformIO Explorer view typically found on the left side of the IDE.
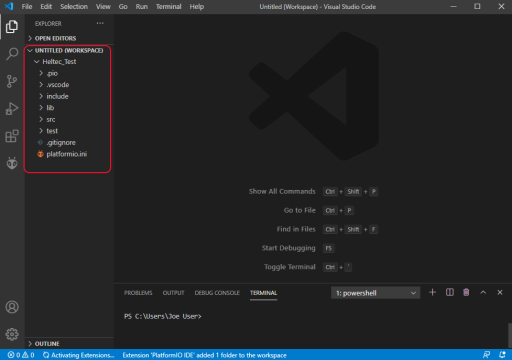
Typical project explorer view.
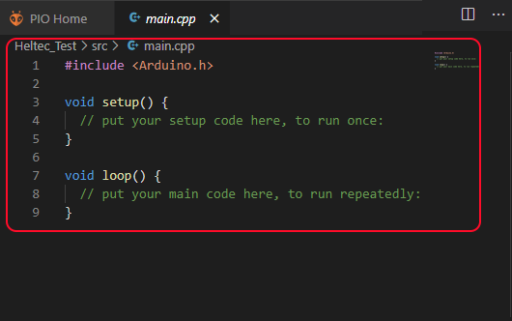
Default project main.cpp
If you are familiar with developing within the Arduino IDE, main.cpp is much the same as the Arduino *.ino. It also contains default setup() and loop() functions.
PlatformIO also adds a required #include <Arduino.h\> statement. This is an important/necessary
difference between PlatformIO and Arduino IDEs.
platformio.ini - project configurations
Let's take a look at the platformio.ini file at the root of our new project. This is where one defines project configuration definitions. In the Arduino world, one would do this via the IDE toolbar selections.
Note: when this file is modified the entire project will be rebuilt when the project is next built or uploaded.
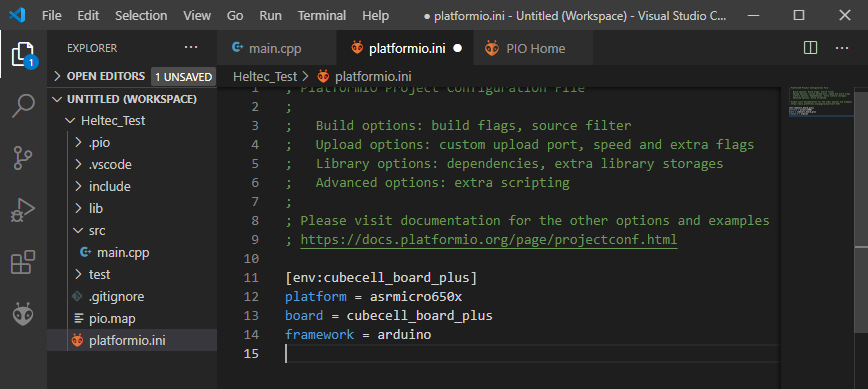
Here we see the platformio.ini file that was created as a result of running the New Project wizard targeting our CubeCell board.
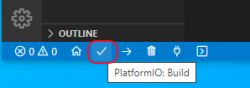
Build the target device application
Now that the template project has been created it's time to build the device application. Within PlatformIO the "Build" button is the check-mark found within the bottom status bar. Clicking on this button should start the build process.
Inspect the build output
Due to the defines within platformio.ini, PlatformIO can determine the project board and framework dependencies. Any missing dependencies are automatically installed at build time, thus this process may be seen in the build output. This feature allows us to add libraries into our platformio.ini file, which will then be downloaded for us, if needed, at build time.
The build process results can be found within the "Terminal View" typically found at the bottom of the VSCode window. Much like with Arduino, the build output will dump the calculated amount of Ram and Flash memory used by your application.
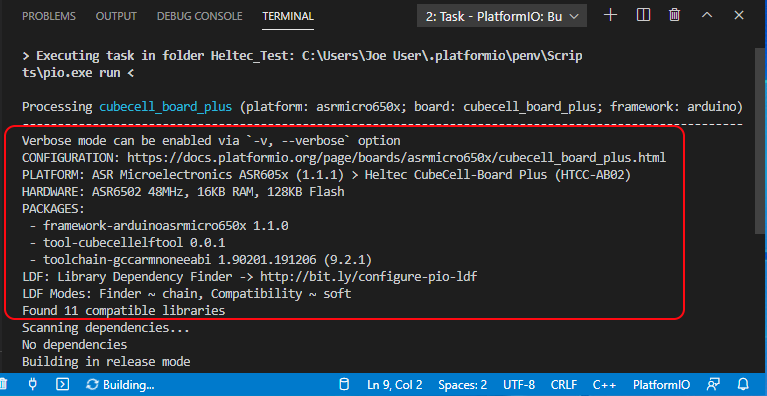
Start of the build output displaying configuration information.
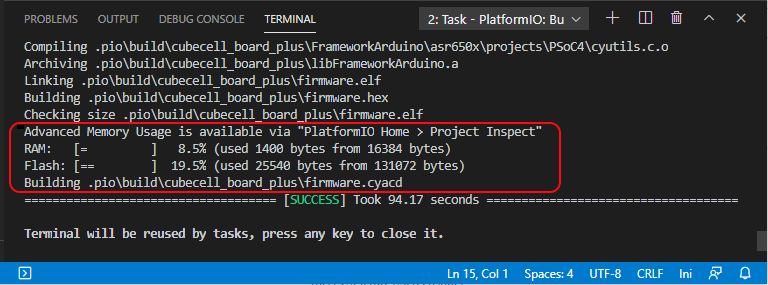
The tail end of the build log shows Ram and Flash usage. There is also a Problems output view that may help when trying to resolve build issues.
List of attached devices
If, within the "PIO Home" view, you select the "Devices" icon on the left, you will see listed any attached physical devices as well as their associated comm ports:
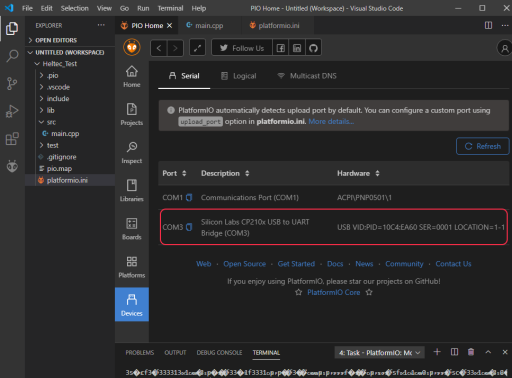
The list should reflect your target device.
Uploading binary to target device
Now that the code has been built successfully, if a target device is attached to your computer the resulting binary can be uploaded to the target device.
The method of uploading the binary to your device may vary depending on the target device. PlatformIO will attempt to configure upload options appropriate for the chosen board. If the default configuration does not work in your instance detailed information can be found within the PlatformIO documentation here or within your target board vendor's documentation set.
We will attempt to include such information along with any sample project code we provided if the procedure is different from that described here.
For instance, our target, the CubeCell has a peculiar
requirement:
Prior to attempting to upload your binary make sure
any terminal session that might be attached to the
debug comm port has been deleted. Occasionally but not
always, PlatformIO will automatically close the comm
port. If it does not upload errors will occur.
Click on the Upload button within the bottom Status bar.
Below you will see a typical output as the binary is uploaded to the target board.

If you have made it this far then we know your environment can build and upload a device application. Now it's time to connect to the Helium network.
Helium Console - Create Device
In order for a target device to communicate via the Helium Network a user account must first be created. Once the user account is created then a console device must be created.
When creating the console device, make note of the DevEUI, AppEUI, and AppKey device credentials. These are used to connect to the network and will need to be inserted into the device application code below. A console quick start guide can be found here.
Sample Helium Network Access Code
If you have not created a simple template project and you want to try one of the samples you can copy a sample into your workspace where it should build without error. A full PlatformIO project can be found here. Alternatively you can update the template project created above by continuing the following steps.
Update main.cpp
Now that we have the required board and library runtime support installed, let's program the board with an example Helium network-enabled application.
To update the sample application created above:
- open, within PlatformIO, your projects src/main.cpp file
- replace this template main.cpp with the content of the sample application found here. Copy and paste the entirety of it.
Add device credentials
Next, we'll need to replace the placeholder AppEUI, DevEUI, and AppKey values found within the sample program with the real values found on the target device page within the Helium Console.
Note:
 The endianess required for these credentials varies
 depending on the LoRaWAN runtime library implementation.
 Using a custom library implementation will require an
 understanding of that library's endian requirement, big
 endian or little endian.
For our CubeCell example, all values are big endian (msb), the most significant bit on the left.
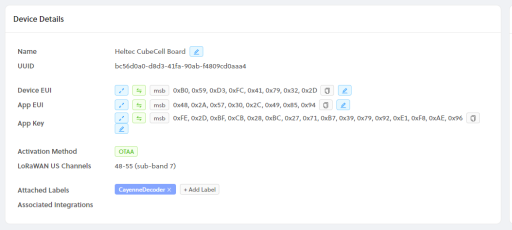
At the top of the main.cpp file, replace the three FILL_ME_IN fields, with the matching field from the Helium Console, example shown below. Your numbers will be different depending on what the console creates when you add your target device.

Verify LoRaWAN channels mask
Runtime library implementations are designed to work across several LoRaWAN regions and networks. The firmware will attempt to join the network using various frequency sub-bands, defined by a channel mask until the join succeeds. It is recommended that you change the default channel mask to a value that will help the join process complete connection to the Helium network in a more timely manner. The process, where and how, to update this channel mask will vary depending on the LoRaWAN runtime implementation
For our example using the Heltec CubeCell and its runtime the following piece of code has been incorporated into the sample projects. Refer to a sample to determine where this code should reside, generally near the above mentioned credentials is fine.
/*LoraWan channelsmask, default channels 0-7*/
uint16_t userChannelsMask[6]={ 0xFF00,0x0000,0x0000,0x0000,0x0000,0x0000 };
platformio.ini - project configurations
For our sample application, we need a few configuration items added to the project platformio.ini file. One set is the project defaults, the next is serial debug monitor configurations and then LoRaWAN configurations.
Complete documentation of platformio.ini content can be found here. Serial debug monitor specific items here.
Note: The comment character for this file type is the semicolon.
For our example, CubeCell project we update the projects platformio.ini with the content from the sample project:
- open, within PlatformIO, your projects platformio.ini file
- replace this template file with the content found here. Copy and paste the entirety of it.
Once you have become more familiar with the LoRaWAN/Helium network feel free to experiment with different configuration settings possible within platformio.ini.
Build the device application
After updating the main.cpp and platformio.ini files it's time to build the device application. Within PlatformIO the "Build" button is the checkmark found within the bottom status bar. Clicking on this button should start the build process.
Inspect the build results
The build output results can be found within the "Terminal View" typically found at the bottom of the VSCode window. Verify the build was completed successfully.
Possible Arduino to PlatformIO porting issues
When porting Arduino sketches to PlatformIO you may find errors such as undefined functions. These may be functions that are called by setup() or loop() or other custom functions prior to them being defined. This is a side effect of the different C version of C compilers used with PlatformIO vs Arduino. In this instance, we just need to define the function prototype before the function is actually called. Another compatibility issue is that, unlike Arduino IDE, you must include Arduino.h at the start of your C file if you are using Arduino-defined constructs. Generally, the compatibility issues are minor.
Verify Heltec runtime configurations.
Running the previous build operation will ensure the Heltec runtime dependencies have been downloaded. At the time of this writing some versions of Heltec's runtime libraries have set default configuration variables to values that are incompatible with the Helium network, especially when the Heltec device is configured to target the North American market. Please follow this link within this document and verify the file content. Return here after verification.
If changes needed to be made it is best to run a "Clean" build process by clicking on the Trash Can button on the status bar followed by a "Build" to ensure the changes have been picked up properly.
Upload Binary to target device
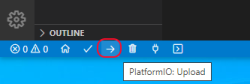
If the build process is completed successfully, upload the binary to the target device via the "Upload" (right-pointing arrow) button found on the status bar
NOTE: Prior to attempting to upload your binary make sure any terminal session that might be attached to the debug comm port has been deleted. Occasionally but not always, PlatformIO will automatically close the comm port, if it does not upload errors will occur.
Successful upload example, your results will vary.
Viewing Target Device Serial Output
When your firmware update completes, the board will reset, and begin by joining the network. The PlatformIO Serial Monitor can be used to view the serial debug output from the board. You will recall that we set the serial port configurations within the platformio.ini file for our project.
To open the serial monitor click on the "Serial Monitor" button within the status bar.
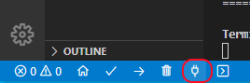
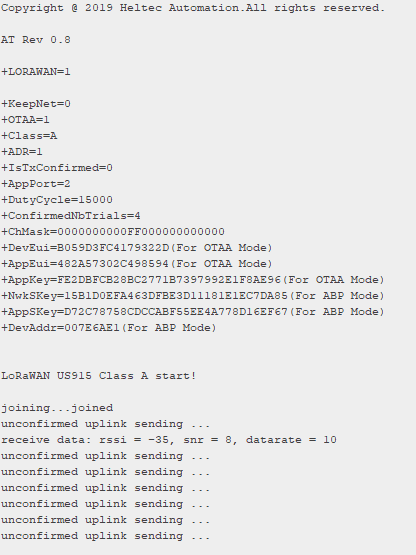
You should begin to see output similar to below.
You can use any virtual terminal emulator for this purpose, but recall certain Heltec boards seem to require the terminal emulator be disconnected from the target device before attempting to upload a new binary.
Helium Console Uplinks
Now let's head back to the Helium Console and login to your account. Once logged in select the "Devices" item on the left, then select the target device previously created. Scroll down a bit on the device page and you should see something similar to the screenshot below.
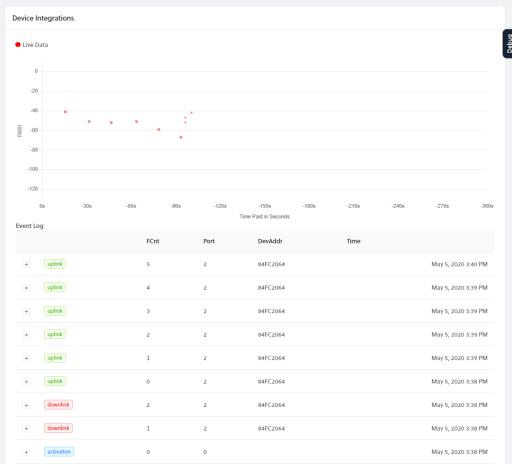
Activation messages are those seen when the device first attempts to join the network. Downlink messages are those delivered from the network to your target device. Uplink messages are those messages delivered from your target device to the Helium network.
Congratulations! You have just transmitted data on the Helium network! The next step is to learn how to use your device data to build applications, visit our Integrations docs here.
Device Application Code Debugging
Unfortunately at this time, CubeCell does not support a debug probe that enjoys built-in support within PlatformIO. Please visit the Heltec community forum found here for help with external debugger questions.
Misc device application hints
Follow this link within this guide for useful application enhancements.
Manual updates to the Heltec runtime libraries
Some versions of Heltec's runtime libraries have set default configuration variables to values that are incompatible with the Helium network, especially when the Heltec device is configured to target the North American market. The following discusses Heltec runtime files that must be inspected to ensure compatibility. The exact location of these files will depend on which operating system you are using, Windows, Linux, or Mac. The typical top-level location of the runtime libraries is shown below for each operating system. From there the following discussions will present to you the file locations within these top-level directories/folders. Please note the Heltec library version numbers are expected to change as time goes on. XXXXX denotes your specific user id.
PlatformIO IDE Heltec runtime library locations:
Windows: C:\Users\XXXX\.platformio\packages\framework-arduinoasrmicro650x\

Linux: /home/XXXXX/.platformio/packages/framework-arduinoasrmicro650x/

Mac OS: /Users/XXXXX/.platformio/packages/framework-arduinoasrmicro650x/
Verify LoRaWAN Data Rate
Within an editor of your choice open the file path formed by prepending the above-described platform-specific top level directory structure to the following file:
libraries/LoRa/src/LoRaWan_APP.cpp    (Linux/Mac)
libraries\LoRa\src\LoRaWan_APP.cpp     (Windows)
Within this file look for
#define defaultDrForNoAdr
Depending on the version of the Heltec runtime that is installed this default may be set to DR_0, DR_3, DR_5 or some other value. Note: DR_5 is not valid for US915, the North American market.
The defaultDrForNoAdr setting is tied directly to the maximum size of the data packet you are transferring.
NOTE: If you try to transfer a packet that is larger than this setting allows, your device may successfully join the network but the data transmitted will fail silently.
| Data Rate (DR) | Max Application Payload |
|---|---|
| DR_0 | 11 bytes |
| DR_1 | 53 bytes |
| DR_2 | 125 bytes |
| DR_3 | 242 bytes |
| DR_4 | 242 bytes |
| DR_5 - 7 | Not Valid |
Update the defaultDrForNoAdr as appropriate for your application needs.
The above values are valid for the US902-928MHz region(North America), the values may differ for other LoRa regions, which you can find here.
Dynamic Data Rate Change
If your application needs to change the current uplink data rate dynamically and Adaptive Data Rate (ADR) is not enabled, one can call the
LoRaWAN.setDataRateForNoADR(int8_t dataRate)
API within your sketch. If you do call this API it must be called after the LoRaWAN.init() within your sketch for the change to be effective.
Verify LoRaWAN preamble size
There are some versions of the Heltec runtime libraries that may set a LoRaWAN preamble size that is incompatible with the current LoRaWan specification. If the preamble size is not set correctly your device cannot join the network. This should be verified in the region-specific file corresponding to the region your device is targeting. Be sure to prepend the above described platform/IDE-specific top-level directory structure.
The following is the file that must be checked if targeting region US915. Within an editor of your choice open the file path formed by prepending the above described IDE/platform specific top-level directory structure to the following file:
Linux/Mac OS: cores/asr650x/loramac/mac/region/RegionUS915.c

Windows:      cores\asr650x\loramac\mac\region\RegionUS915.c
Within this file locate the line below, the 7th parameter which might be 14 should be changed to either 8 or 16. Either value will work. Earlier versions of the runtime may have this value set to 14 which is "not" correct. Change:
Radio.SetTxConfig( MODsEM_LORA, phyTxPower, 0, bandwidth, phyDr, 1, 14, false, true, 0, 0, false, 3e3 );
To:
Radio.SetTxConfig( MODEM_LORA, phyTxPower, 0, bandwidth, phyDr, 1, 8, false, true, 0, 0, false, 3e3 );
Heltec support has been notified of these issues. Hopefully, a future release of those libs will resolve the issues.
Patching ADR Functionality
The CubeCell may have issues joining the network with ADR OFF. If you're using ADR ON, you may also encounter an issue where your CubeCell stops successfully sending packets after a few minutes. This is caused by the CubeCell firmware's ADR behavior and may happen if your payload is above the DR0 maximum size (11 bytes).
To patch the CubeCell firmware, find and open the RegionUS915.c in the following location.
Windows: C:\Users\XXXX\.platformio\packages\framework-arduinoasrmicro650x\cores\asr650x\loramac\mac\region\RegionUS915.c

Linux: ~/.platformio/packages/framework-arduinoasrmicro650x/cores/asr650x/loramac/mac/region/RegionUS915.c

Mac OS: /Users/XXXXX/.platformio/packages/framework-arduinoasrmicro650x/cores/asr650x/loramac/mac/region/RegionUS915.c
Find the following lines in the file and comment them out:
// Decrease the datarate
getPhy.Attribute = PHY_NEXT_LOWER_TX_DR;
getPhy.Datarate = datarate;
getPhy.UplinkDwellTime = adrNext->UplinkDwellTime;
phyParam = RegionUS915GetPhyParam(&getPhy);
datarate = phyParam.Value;
This will prevent the CubeCell from reducing the Data Rate over time and allow you to send larger packets on a repeated, prolonged basis.
Device application hints
Using HTCC-AB02S Board with GPS Capable Sketch
If you are using the HTCC-AB02S board with a program that is GPS enabled but find the device is unable to obtain a GPS lock you can try changing the GPS data satellite source via the GPS class Air530.setMode() API. Add the Air530.setmode() to the setup() method of your sketch.
// MODE_GPS - US,
// MODE_GPS_BEIDOU - Chinese - This is the default
// MODE_GPS_GLONASS - Russian
// set what works best for your connectivity, for example:
Air530.setmode(MODE_GPS);
A sample GPS enabled project for the CubeCell can be found here.
Dynamically altering Data Rate
A recent change to the Heltec runtime exposes an API interface a device application can use to alter the current LoRaWAN data rate.
LoRaWAN.setDataRateForNoADR(int8_t dataRate);
This should be done sometime after LoRaWAN.init() is called.
Complete example
Consider the following code from the helium/longfi-platformio repository: