Arduino
RAKwireless WisBlock Arduino Guide
Introduction to Guide
Before we begin, please make sure you've followed the steps from this guide, which goes over some initial setup steps.
Objective and Requirements
In this guide, you will learn:
- How to setup your environment
- How to program a basic application that will send packets over the Helium Network
- Verify real-time packets sent to the Helium Console via Hotspot that's in range
For this example, you will need the following:
Hardware
- RAKwireless WisBlock Starter Kit
- Micro USB Type B Cable - Example
Software
Hardware Setup
Attaching the LoRa and BLE Antennas
Your WisBlock Starter Kit should have come with two U.FL antenna.
- the one that resembles an "I" is the LoRa antenna, this one connects to the connector on the core module marked LoRa, which is below the large K in the RAK logo.
- the one that resembles a "T" is the BLE antenna, this one connects to the connector on the core module marked BLE
Connect Board
Next, lets connect our board to our computer with a USB 2.0 A-Male to Micro B cable.
Software Setup
Getting the Arduino IDE
Download and install the latest version of Arduino IDE for your preferred OS. (At least v1.6.12)
Following the Arduino IDE installation instructions that are appropriate for your development platform. It is suggested you allow the device driver installation for your target device if prompted.
If you are using Windows 10. Do NOT install the Arduino IDE from the Microsoft App Store.
Please install the original Arduino IDE from the Arduino official website!
The Arduino app from the Microsoft App Store has problems using third party Board Support Packages.
Installing Arduino Board Support
The WisBlock Starter Kit requires the installation of an Arduino board support package. Follow the instructions below.
To install, open your Arduino IDE:
- Navigate to (File > Preferences), (Arduino > Preferences) on MacOS.
- Find the section at the bottom called Additional Boards Manager URLs:
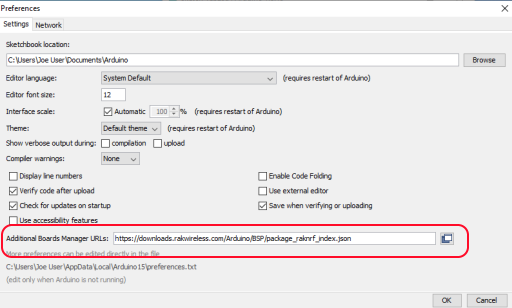
- Add this URL in the text box:
https://raw.githubusercontent.com/RAKwireless/RAKwireless-Arduino-BSP-Index/main/package_rakwireless_index.json
- Click "OK" to close the Preferences windows
Next, to install this board support package into the Arduino IDE:
- Navigate to (Tools > Board > Boards Manager...)
- Enter RAKwireless in the search bar.
- On the RAKwireless nRF Boards item select the newest version and then click Install
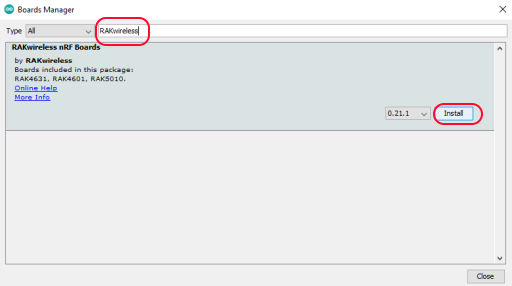
When the board installation process has finished, close the Boards Manager dialog.
Install SX125x-Arduino Support library
Next we need to install the LoRaWan support library.
- Navigate to (Sketch> Include Library > Manage Libraries...)
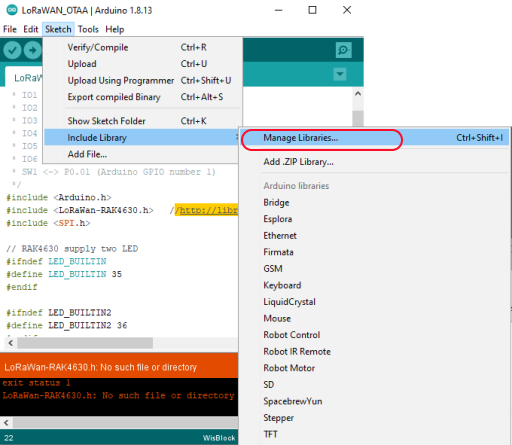
- Enter SX126x-Arduino in the search box
- On the SX126x-Arduino item select the newest version and click Install
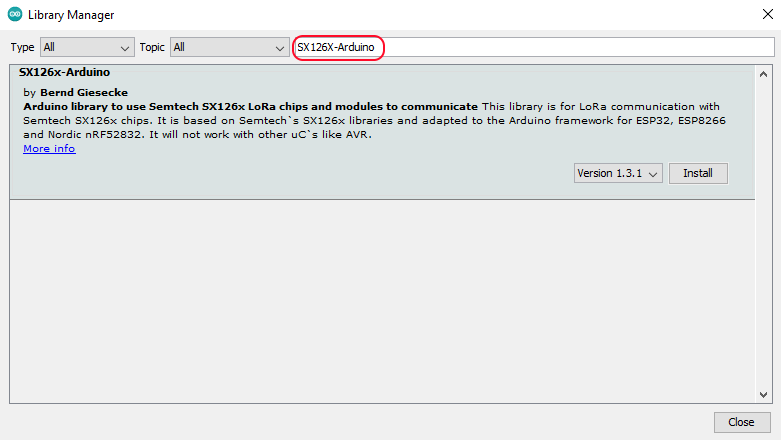
When the library installation process has finished, close the Library Manager dialog.
Install Serial Driver
Some operating systems, especially Windows, may require the installation of hardware specific USB device driver code. In general it's best to just try to upload a built application before installing new device drivers.
If the upload fails and you believe it is a device driver issue refer to the WisBlock support forum found here for the most up to date information. Search within the WisBlock category.
Set Project Configuration Options
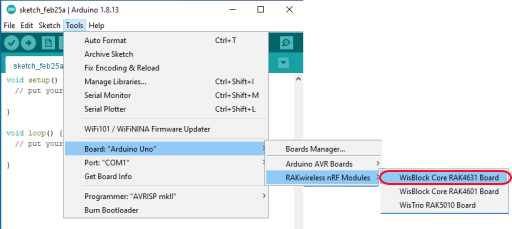
The target board type and LoRaWan Region are set via the Arduino IDE Tools menu as follows:
-
Board Type: Select (Tools> Board>RAKwireless nRF Modules>WisBlock Core RAK4631 Board )
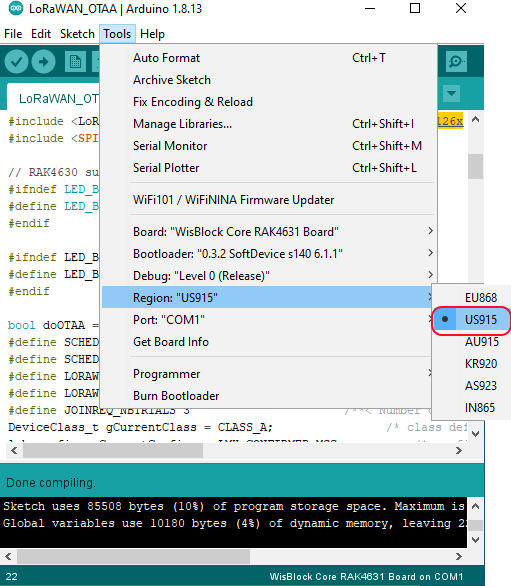
-
LoRaWan Region: Select (Tools> Region>US915 )
-
Set Debug level as desired: Select (Tools> Debug )
-
Port number is important and may be automatically selected for you if not it can be changed via: (Tools> Port )
Unlike some other board types the remaining LoRaWan configuration items for a WisBlock are via defines within the sketch. For example:
// example LoRaWan configuration defines
bool doOTAA = true;
DeviceClass_t gCurrentClass = CLASS_A
lmh_confirm gCurrentConfirm = LMH_UNCONFIRMED_MSG
#define LORAWAN_DATARATE DR_0
#define LORAWAN_TX_POWER TX_POWER_5
#define JOINREQ-NBTRIALS 3
Programming Example Sketch
Now that we have the required Arduino board support and library installed, lets program the board with the provided example sketch.
Example Sketch
To create a new Arduino sketch, open your Arduino IDE, (File > New). Next, replace the template sketch with the sketch found here, copy and paste the entirety of it.
Add device credentials
Next we'll need replace the placeholder AppEUI, DevEUI, and AppKey values found within the sample program with the real values found on the target device page within the Helium Console.
NOTE:
 The endianess required for these credentials varies
 depending on the LoRaWan runtime library
 implementation. Using a custom library implementation
 will require an understanding of that libraries
 endian requirement, big endian or little endian.
For our WisBlock example all values are big endian (msb), most significant bit on the left. Be sure to use the formatting buttons to expand the ids and match the endianess formatting required for the sketch, as shown below.
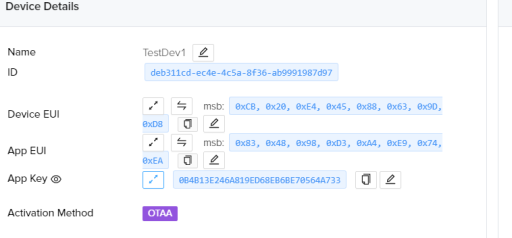
At the top of the main.cpp file, replace the three FILL_ME_IN fields, with the matching field from the Helium Console, example shown below. Your numbers will be different depending on what the console creates when you add your target device.

Build the Sketch
Once the device ids have been entered build the firmware by clicking on the check mark button found at the right side of the Arduino IDE tool bar.
Upload Built Firmware
We're finally ready to upload our sketch to the board.
- First, without your device connected to your development platform, within the Arduino IDE make a note of which comm ports are currently detected. (Tools > Port:).
- Next connect your WisBlock device to your development computer.
- Finally within the Arduino IDE select the comm port associated with the WisBlock. (Tools > Port: COM#/ttyACM#). The correct one will be the one newly added after the device was connected.
If you are still unsure which port is associated with
the WisBlock you may need to disconnect the device,
restart the Arduino IDE, then check the available ports
via "Tools>Port:" prior to re-connecting the device.
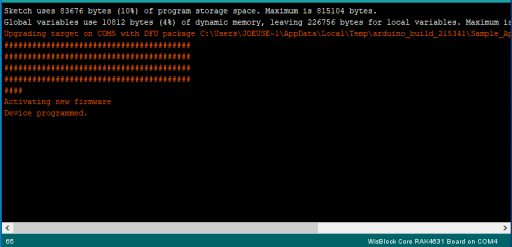
In the Arduino IDE, click the right arrow button, or navigate to (Sketch > Upload), to build and upload your new firmware to the board. You should see something similar to the image below at the bottom of your Arduino IDE, when the upload is successful.
Viewing Serial Output
When your firmware update completes, the board will reset, and begin by joining the network. Let's use the Serial Monitor in the Arduino IDE to view the output from the board.
We first need to verify the connected serial port again as it may be a different port than the one shown in the firmware upload progress view seen above.
Again navigate to (Tools > Port: COM#/ttyACM#), and verify the proper serial device is selected.
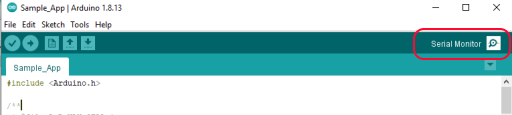
Then open the serial monitor by clicking on the icon in the upper right corner of the Arduino IDE.
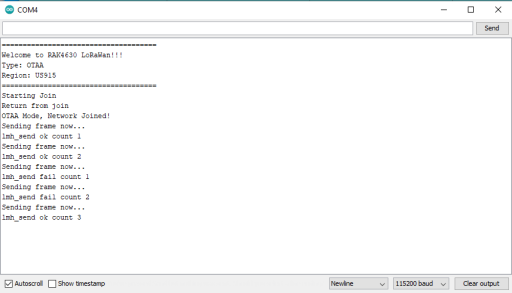
When the monitor opens you should begin to see output similar to below.
Now let's head back to Helium Console and look at our device page, you should see something similar to the screenshot below.
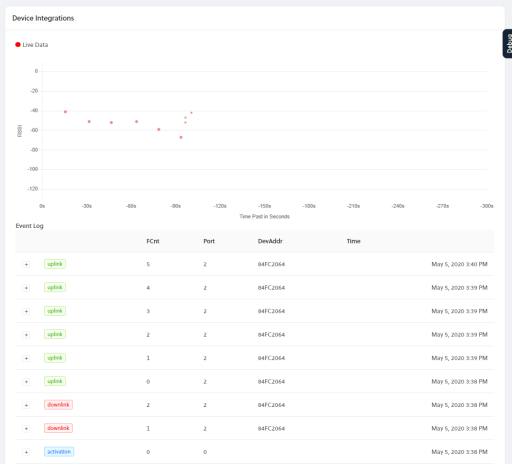
Congratulations! You have just transmitted data on the Helium network! The next step is to learn how to use your device data to build applications, visit our Integrations docs here..
Examples and Tutorials
After you have installed the RAK WisBlock support into the Arduino IDE board you can see more WisBlock examples by navigating to (File > Examples > RAK WisBlock Examples...)
NOTE: These examples have not been verified to be
compatible with the Helium network. But they will
demonstrate various aspects of the WisBlock development
 board.
For more information about the examples and tutorials visit the RAKwireless WisBlock Github repo located here.